|
DAY 2
We will meet at 9 a.m. sharp at the
historic, photo-rich 'Bumann Ranch, in Olivenhain, Ca
Directions given at class on Day 1
Lunch at noon will be at the Harvest Ranch market nearby, custom made sandwiches and salads, yum.
Class runs until 4:00 p.m.
Here's an article on the ranch:
https://thecoastnews.com/encinitas-homestead-ranch-awaits-national-historical-recognition/
_____________
DAY 3
We will meet at 9 a.m. sharp at the
'Spanish Village' in Balboa Park!
Directions at bottom of page.
We will take a lunch at a little deli/sandwich shop in the park next to the photography museum at noon.
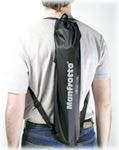
If you have a camera with lots of lenses and attachments, a 'photo back pack' would be a good idea to get. Carrying around your equipment all day will definitely take a toll on your energy level. (See 'getting really pooped out' in the dictionary.) We have a couple for sale at the gallery.
Class ends with a 'Certificate of Completion' ceremony (well earned) at 4:00 p.m.
_______________
Definite field items to bring:
1. A tripod with a 'ball head'. Notes on the right kind to get are further down- make sure you get the right one for your needs. If needed, low priced rentals ($20 for one or two days) are available from Michael (rental fee can be applied toward purchase, as we now carry two lines at reasonable pricing).
2. Tripod bag, but not necessarily for this particular class if it's the weekend one only, we will shoot the whole time and not put it away sometimes like we do for the one week classes. (We now carry a couple in our store/gallery).
3. Camera and preferred film (does not matter which kind) or your digital memory card and a back up one.
4. Camera instruction manual. NEVER leave home without it.
5a. Spare batteries. If you don't have them, get them NOW- and make sure they are charged up. Who wants to be making a possible award winning image and then miss out because of this lack of preparedness?
5b. THE battery charger. Handy for that emergency charge up when you find out the re-charged spare is dead as a door nail, YIKES! It's pretty easy to find a shop owner around that will let you 'borrow' an electrical outlet. Most re-charge fully in an hour, and your back to having 'fun' again.
6. Small note pad and pen or pencil for making field notes.
7. Hat and sunscreen. Especially if you are fair skinned. 99% of the time it's very sunny here. For your northerners flying in: even if it's overcast, fair skinned people tend to get sun burnt due to our southern location in So. California, closer to the equator- the UV rays are dangerous.
8. UV and Polarizer filters. They screws on the front of your lens- (for most lenses). If you have an 'auto focus' camera, you will need the 'circular polarizer', if you don't, a regular 'linear' one is the type you will need, and those are less expensive. They run about $50 -$60, depending on brand name/style needed. The best money you will ever spend, besides taking a Seewald class or getting the right tripod and ball head ;/) . NOTE: we now carry them, and ours average $30.
The UV is for protection mostly, so you don't scratch your expensive, multi-coated lens. Most of the 'low end' digital cameras will not have screw-on filter capability, but you can hold your polarized sunglasses over the lens for the same effect in many cases, or buy the filter and just hold it over it too, as the ear piece from sunglasses are hard to work around.
9. Photo vest. These make shooting so much easier, and that makes it fun. So many items available with a reach to a pocket.
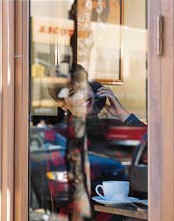
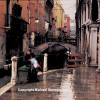
About 20% of our students show up thinking their 'UV' filter is a polarizer, IT IS NOT! If not sure, go check your filter now, it should say PL on it, or PL CIR for 'circular polarizer' (NOT meaning that it's round, but that it will let auto-focus mechanisms work THRU it). Michael has one for each lens and just leaves them on, as it's virtually needed to enhance every scene out there. You'll see it in class, and furthermore ... here is why, look at the difference one makes!
Click photo to enlarge.
Without and then with the polarizer.
 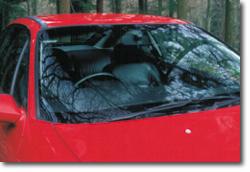
Without and then with the polarizer.
Notice there is not only less reflections in the window, but the reds are more dramatic due to the reflection of the blue sky in the paint itself being eliminated!!!
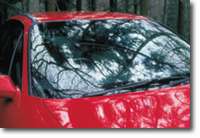
Without and then with the polarizer.
Notice there is so much reflection from the 'outside world' in the window you can barley see through the glass and into the shop with the lady? Notice the reflections disappear with it. Hard to believe it's the same shot huh? Still think you don't need one?
 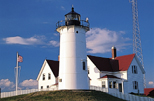
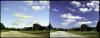
Without and then with the polarizer.
Notice how much more vivid the clouds look; hey, look how much you are learning from the class before it even starts! Michael should have a price increase already, don't you think?
Basically, a polarizer:
* Reduces glare and unwanted reflections
* Saturates colors
* Deepens blue skies
* Improves contrast
* Penetrates haze
By the way, they must be turned to work properly for each different scene! The amount of reflections will or will not be eliminated with this adjusting procedure.
10. Rain gear/ layered clothing. (Umbrella and rain poncho) change of clothes or layering of clothes (you can leave it all in your car if it not threatening or at home if it's not in the forecast at all- if you trust them that is). Michael always has a small, fold up umbrella he sticks in his vest pocket (most pro-jackets have a place for them) and a rain poncho folded up and stuffed in the back pocket of the jacket. If he knows it will rain, he puts a 'golf umbrella' in with his tripod in his tripod bag to make sure shooting in the rain is actually fun. You see, rain is your friend if you stay dry (as you can make spectacular photos in it when everyone else is cowering under door entryways or inside).
11. A photo backpack -(but not a must). For those of your real serious shooters with many lenses (and if you are you probably already have one), if not, we suggest you do.
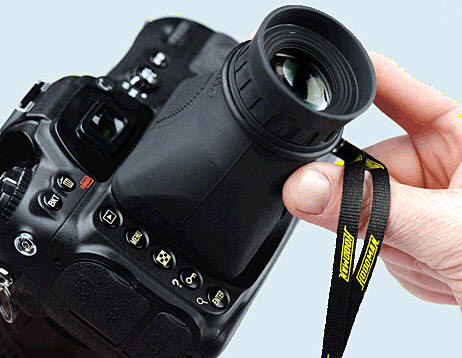
A loupe
This is a ‘Hoodman’, which is a 1:1 screen viewer for 35mm camera screens. Let's one see exactly what they doing in seconds, regardless of the sun or light conditions. Recommended for anyone who shoots outdoors on a regular basis. About $80 for these good one, about $20 for a pop-up screen type. We now carry these, please reserve one if you need it.
12. A 'loupe'. A device to help you view your photos on the back of your camera after you take them, also for viewing the info also. HOW? They stop all the reflected light that makes it semi-impossible to view. It's a magnifying device and a darkener too. Not an absolute necessity, but as close as something could be without being one. You'll be way ahead of the game with one, and those that bring them are envied in seconds once you see how great they are. Notice they even work great on cell phones too.
You will need to bring (beg, borrow or steal)
a GOOD, 'USER FRIENDLY' tripod
That means one WITH a 'ball head' (that's the user friendly part).
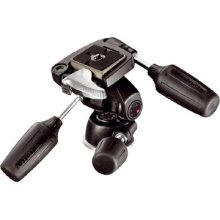 Is this a 'ball head'? Is this a 'ball head'?
IF you said YES, or are not sure, (as you would be wrong) and since you will need one for Day II and III of class, click here and read about them, and why you will need one on your tripod. If you are sure you know what a ball head is already (and would bet you life?) and have one for class, skip this link.
If you know what they are, but don't have a tripod with one yet, you can rent one from us for only $20. Rental fees can be applied to a purchase if you'd like. The Bogen Manfrotto, and Dolica, tripods we carry are so lightweight, sturdy and user friendly that 90% of the students usually do purchase them. We can show you what we have on day one, since you'll be at our gallery where we keep them, and are not needed until the next day, we don't shoot on day one.
A photo vest might be nice also but don't get one just for class, get one if you will be wanting to go on trips and make photos and plan on getting serious about your art. ('ART' you say? Well yeah, after class you WILL BE AN ARTIST, and get a piece of paper (certificate of completion) stating so to prove it, so there!!!).
A tripod bag makes carrying your tripod easy, or an attached strap works ok (many we sell come with them), as it then frees up both hands since you just sling the bag over your shoulder (although we will be shooting the whole time on day two, so on this day it's not too important- but get one for your future photo outings). Some photo back packs have a strap to hold the tripod with.
This kind of shoulder carrying bag is convenient for walking around when you are traveling as you will always want to be ready to capture that 'best of show' photo that we occasionally run across. Usually the ones for one shoulder work best, those are what we carry.
Class is held rain or shine.
Note: this very seldom happens down at our San Diego class (it's basically a desert). If there is rain predicted, bring rain gear... but we can work in the hallways of the museums, etc. to make our photos. It's not as bad as it might sound.
 If rain is a possibility bring rain gear too, a large umbrella and warmer clothes. And of course we can work in the hallways of the museums instead of the open air any time we wish. Usually is does not rain much even when they say rain, but who knows? If rain is a possibility bring rain gear too, a large umbrella and warmer clothes. And of course we can work in the hallways of the museums instead of the open air any time we wish. Usually is does not rain much even when they say rain, but who knows?
As Michael says, “a lot of my best work is done on rainy days, as it creates a better mood of light, etc.. I bring a golf umbrella and work under it, as long as I stay dry it’s not bad at all working when it’s pouring out.”
Either way, the afternoons get a bit cool except for mid-summer, but especially in spring and fall. In winter, downright cold is not unusual.
LASTLY, but maybe more importantly than anything else: please bring your ‘positive mental attitude’, especially if you don’t usually have one- it will help you go a lot lot further. Mucho info will be given and it overwhelms some, especially when trying to put it all in practice on the first half of Day II. Just know that this is normal and you won't be the first, nor the last, ok? Please read the following testimonial.
______________________
"Michael, thanks for the great time.... Even though I experienced some frustration (about mid-way thru day 2) I kept reminding myself what an opportunity this was that I decided to take advantage of and to make the best out of it. Then my rate of absorption took off... I am truly inspired. "
Thanks,
West Flato, San Diego, California,
Weekend class of 1.21.'06
______________________
At 4 p.m. we will have our closing ceremony for those not taking day three, and you will be awarded your beautiful, and well deserved, 'Certificate of Completion'. They will be signed by Michael and worthy of framing and displaying... ALRIGHT, pat ourselves on the back!
Any other questions? Let us know. About those spare batteries... usually someone has one die just after getting to class and turning on the camera. We do so much shooting and (if digital) looking at the images on the back of our cameras that we are almost guaranteed our first, and sometimes second, battery sets die.
Ok, let's go find out what a WOW image is and learn how to 'make them', not take them!!!
Click her to print out
the field item checklist from above:

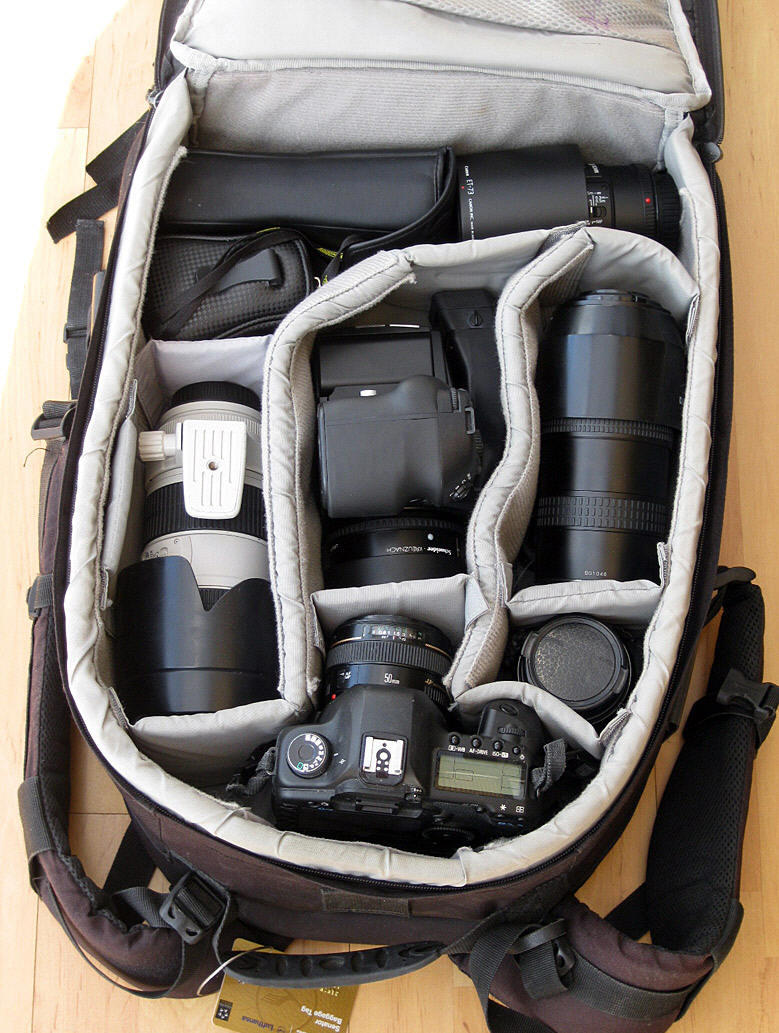
Click photo to enlarge.
Camera backpack.
Note: We carry a variety of Manfrotto backpacks.
If you are getting serious and have have a few lenses now, you'll eventually need to get a camera backpack to make outdoor shooting fun, as this distributes the weight, as well as protects, and makes it fast to change lenses, so you don't miss that award winning shot.
|